Galaxy Australia is capable of de novo assembling genomes based on PacBio high fidelity reads built from circular consensus sequence HiFi reads.
This How-to-Guide will describe the steps required to assemble your genome on the Galaxy Australia platform, using multiple workflows (see Fig 1) developed in consultations between the Bioplatforms Australia Threatened Species Initiative, Galaxy Australia, and the Australian BioCommons.
Quick start guide
- Login to Galaxy Australia
- Create a new history
- Upload your HiFi
ccs.bamdata files to your Galaxy history - Load and execute workflows (links included below), using required options
- FILE CONVERSION workflow:
BAM to FASTQ + QC v1.0optional - ASSEMBLY workflow:
PacBio HiFi genome assembly workflow v2.1 - PURGE DUPLICATES workflow:
Purge duplicates from hifiasm assembly v1.0optional
- FILE CONVERSION workflow:
- Review workflow report and perform additional QC as needed
- Re-run workflows, or individual tools, as needed
How to cite the workflows
Price, G. (2022). BAM to FASTQ + QC v1.0. WorkflowHub. https://doi.org/10.48546/WORKFLOWHUB.WORKFLOW.220.2
Price, G., & Farquharson, K. (2022). PacBio HiFi genome assembly using hifiasm v2.1. WorkflowHub. https://doi.org/10.48546/WORKFLOWHUB.WORKFLOW.221.3
Price, G. (2022). Purge duplicates from hifiasm assembly v1.0. WorkflowHub. https://doi.org/10.48546/WORKFLOWHUB.WORKFLOW.237.2
The overall workflow
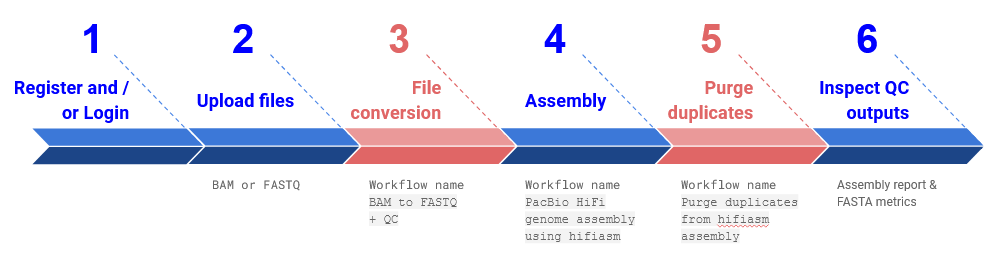
Fig 1. The approach described in this How-to-Guide, including Quick Start guide steps 1) registration, 2) upload of input BAM file, 3) BAM to FASTQ conversion workflow, 4) assembly workflow, 5) purge duplicates workflow and 6) reviewing the assembly report and FASTA metrics. Required workflow steps are blue, and optional steps are red.
Further to this, a summary of the different elements of this assembly approach are detailed below:
| Process name | Workflow name | Description | Inputs | Outputs |
|---|---|---|---|---|
| UPLOAD FILES | Not applicable | See the different upload options. | BAM (start at step 3 in Fig 1), or FASTQ (start at step 4 in Fig 1) | Uploaded data! |
| FILE CONVERSION | BAM to FASTQ + QC | Conversion of files from BAM to FASTQ, including a FASTQC quality control (QC) step. | FASTQ file, FASTQC report HTML file | |
| ASSEMBLY | PacBio HiFi genome assembly using hifiasm | Assembly using the hifiasm tool, including Bandage visualisation and QC. | Assembly file in FASTA format, FASTA metrics, Assembly report file | |
| PURGE DUPLICATES | Purge duplicates from hifiasm assembly | Optional workflow to purge duplicates from the contig assembly. | Purged primary sequences from draft assembly (FASTA), Purged haplotig sequences from draft assembly (FASTA) |
The WorkflowHub entries are all available in this collection.
In-depth workflow guide
Register and login
- To register for Galaxy Australia, visit the login page.
- Click the
Register herelink, as shown in Fig 2. - Complete the registration wizard and click
Create. - Login to your account!
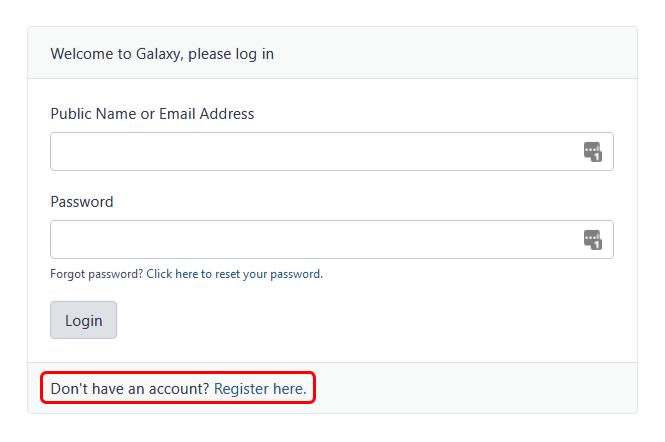
Fig 2. Log-in / registration menu for Galaxy Australia.
Upload data file(s)
- Select your data using the Bioplatforms Data Portal
- The files you need for the assembly are
.css.bamformat - Fig 3 shows a HiFi data set selected in the data portal browser interface.
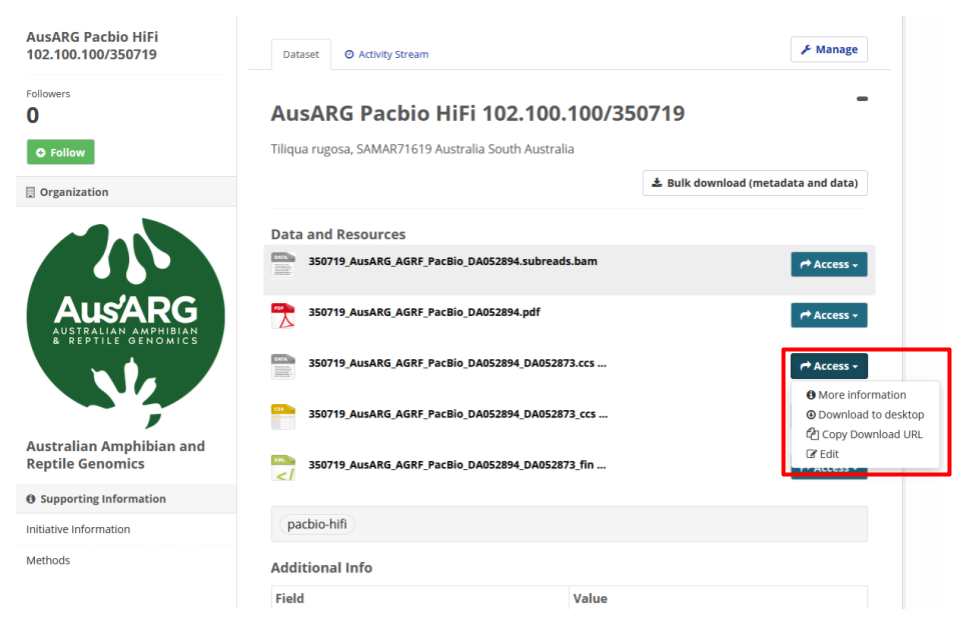
Fig 3. The appearance of a HiFi data set in the Bioplatforms Australia data portal browser interface.
- The files you need for the assembly are
-
Click
Accessand selectCopy Download URLin the drop down menu (see Fig. 3).- Note: This will copy a download URL to your clipboard.
- The URL is time sensitive and will expire after 10 minutes.
- Please note you only need to instigate the download within this 10 minute window. The import itself can take longer than 10 minutes.
-
In Galaxy Australia, create a new history
- Now, perform the steps outlined in Fig. 4
- Step 1: Click on
Upload Data - Step 2: Select
Paste/Fetch data - Step 3: Paste the URL you obtained from the data portal into the content box.
- Step 4: Select
Start
- Step 1: Click on
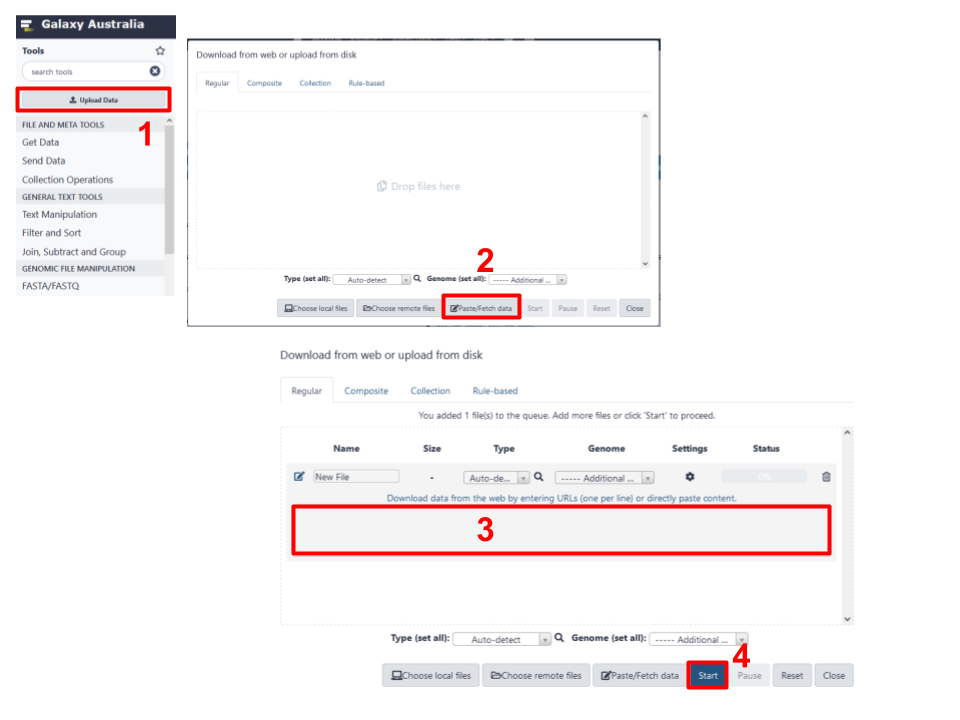
Fig 4. Process required for download of data based on a URL provided to Galaxy Australia.
Other data transfer options are also available
Self-managed (download & upload)
- Download required HiFi data to your personal computer, then
- Upload / transfer to Galaxy Australia (see Fig 5)
- Note: the following Galaxy Training Network tutorial provides guidance on how to upload files via URL. The same mechanism can be used to upload local files, by selecting
Choose local files(see Fig 5).
- Note: the following Galaxy Training Network tutorial provides guidance on how to upload files via URL. The same mechanism can be used to upload local files, by selecting
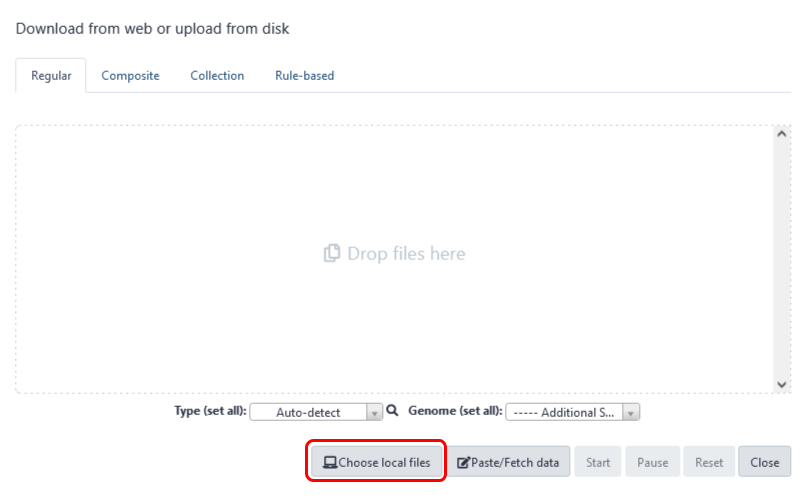
Fig 5. Choosing local files to upload to Galaxy Australia.
Supported
- Contact the Galaxy Australia Support team for data chaperoning.
OPTIONAL STEP: convert BAM files to FASTQ
This workflow is not needed if files are already in FASTQ format
You must do this step if your files are in
ccs.bamformat
You will need to complete this workflow for each BAM file
- Make sure you are logged into Galaxy Australia
- Visit this link to:
- retrieve the workflow for file conversion,
- add it to your Galaxy Australia workflows list, and
- open your workflows list (which can also be reached by clicking the
Workflowtab, highlighted by a red box in Fig 6, in the Galaxy interface)
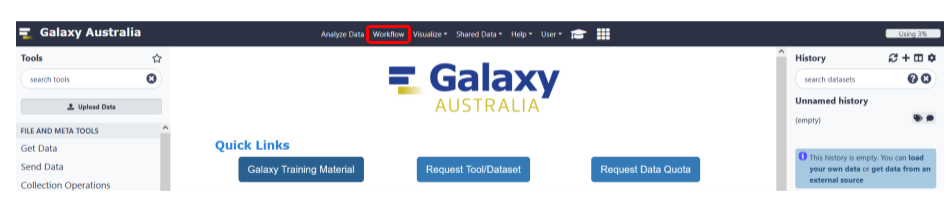
Fig 6. The main page of the Galaxy Australia service.
Edit.- Once you have reached the workflow screen, select the
playbutton (highlighted by a red box in Fig 7) for theBAM to FASTQ + QCworkflow.
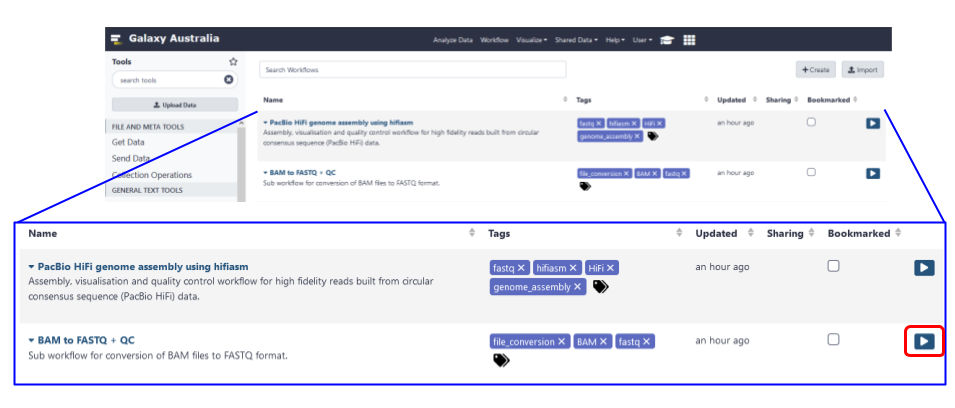
Fig 7. The workflows page of the Galaxy Australia service is where your workflows appear. The blue box is a zoom view of the workflow table, and the play button to launch your workflow is highlighted by a red box.
- The workflow invocation window will open. Select the BAM file that you previously loaded into your Galaxy history using the drop-down menu (step 1 in Fig 8).
- Click
Run workflow(step 2 in Fig 8).
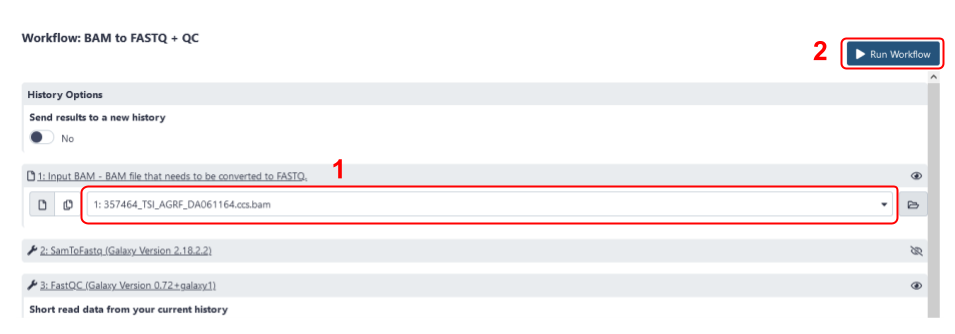
Fig 8. The workflow invocation menu for the BAM to FASTQ + QC workflow. Step 1 is to select the BAM file for conversion using the drop-down menu, and Step 2 is to select Run workflow.
- The workflow will produce
- A
FASTQ filethat will be the input for the assembly workflow covered in the next section (Fig 9a), and - A
FastQC reportwhich you can view in the Galaxy user interface (Fig 9b).
- A
- If you only have a single BAM file, stop here! If you have multiple BAM files, repeat this entire section of the tutorial for each BAM file:
Concatenate datasets tail-to-head (Galaxy Version 0.1.1) can be used for this purpose.
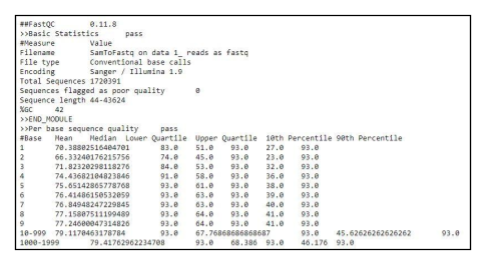
Fig 9a. Example Fastq file output.
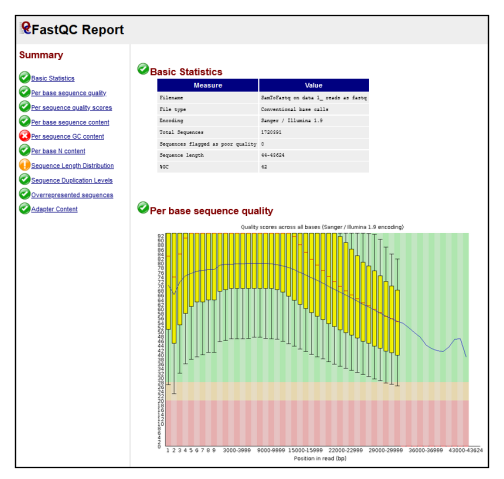
Fig 9b. Example FASTQC html report.
OPTIONAL STEP: joining multiple FASTQ files (e.g. from multiple flow cells)
Concatenate datasets tail-to-head tool in Galaxy Australia (see below).
Note that you can insert multiple data sets (i.e. FASTQs), and should only concatenate files with identical formats.
- Search for the
Concatenate datasets tail-to-headtool in the Galaxy Australia browser interface (step 1 in Fig 10). - Select the tool from the search results (step 2 in Fig 10).
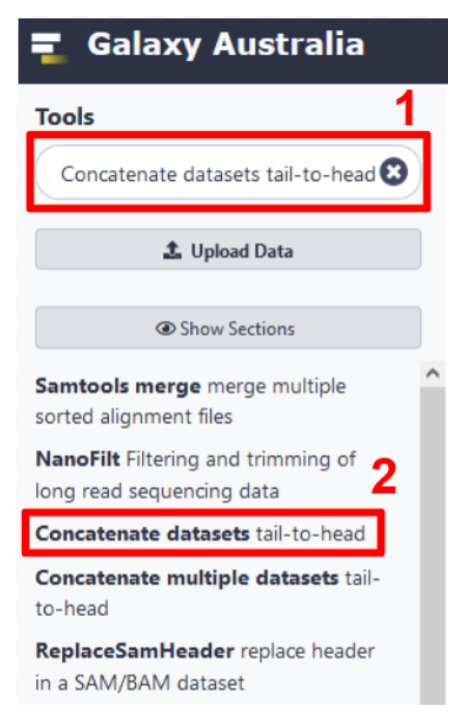
Fig 10. Search for and open a tool using the Galaxy Australia interface.
- In the tool menu, select the first FASTQ data set (step 3 in Fig 11).
- Insert additional FASTQ data sets by selecting the
+ Insert Datasetbutton (step 4 in Fig 11). - When all data sets are selected, press
Execute(step 5 in Fig 11).
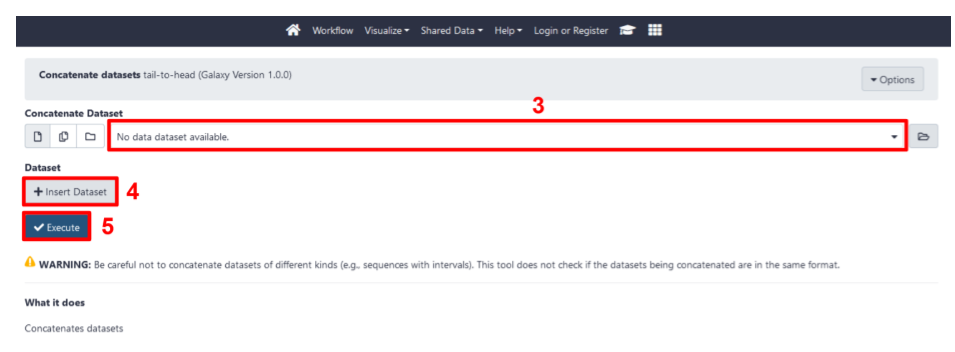
Fig 11. Select data sets and execute the Concatenate datasets tool.
Assembly workflow
HiFiAdapterFilt identifies .ccs
reads containing adapter sequences using the same method as NCBI and removes the entire read prior to genome assembly
to avoid such misassemblies.- Make sure you are logged into Galaxy Australia
- Visit this link to:
- retrieve v2.1 of the assembly workflow,
- add it to your Galaxy Australia workflows list, and
- open your workflows list (which can also be reached by clicking the
Workflowtab [highlighted by a red box in Fig 6] in the Galaxy interface)
- Select the play button (highlighted by a red box in Fig 7) for the
PacBio HiFi genome assembly using hifiasm v2.1workflow (the workflow is shown in Fig 12).
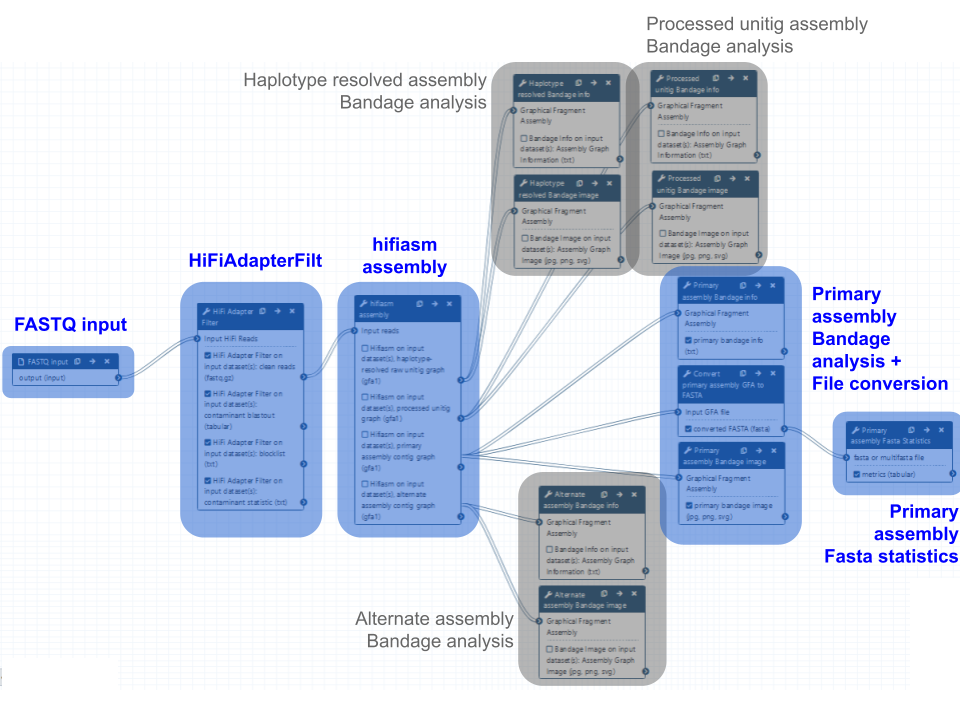
Fig 12. PacBio HiFi genome assembly using hifiasm. The blue boxes indicate the main steps in the workflow, which produce the primary hifiasm assembly. The grey boxes indicate the other outputs of hifiasm, which are hidden but still accessible after the workflow has been run.
- The workflow invocation window will open.
- Select the FASTQ file that was produced by the
BAM to FASTQ + QCworkflow using the drop-down menu. - Select correct workflow input parameters
- Click the
Run workflowbutton (as in step 2 of Fig 8). - The
PacBio HiFi genome assembly using hifiasmworkflow produces the following outputs (Fig 13):- Bandage info and images for:
- Primary assembly contig graph
- Alternate assembly contig graph
- Processed unitig graph
- Haplotype resolved raw unitig graph
- FASTA file for the primary assembly contig GFA file
- Fasta statistics for primary assembly contig FASTA file
- Bandage info and images for:
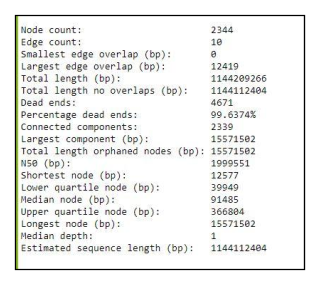
Fig 13a. Example Bandage info file for primary assembly contig graph.
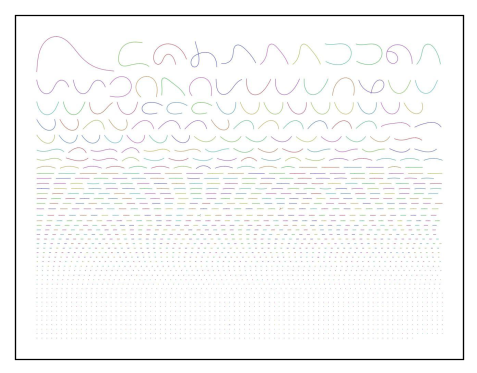
Fig 13b. Example Bandage image file for primary assembly contig graph.
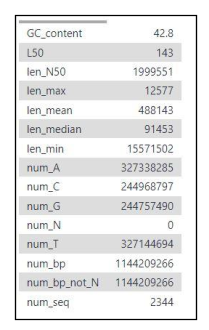
Fig 13c. Example Fasta statistics for primary assembly contig FASTA file.
OPTIONAL STEP: Purge duplicates from hifiasm assembly
- Make sure you are logged into Galaxy Australia
- Visit this link to:
- retrieve the purge duplicates workflow,
- add it to your Galaxy Australia workflows list, and
- open your workflows list (which can also be reached by clicking the
Workflowtab [highlighted by a red box in Fig 6] in the Galaxy interface)
- Select the play button (highlighted by a red box in Fig 7) for the
Purge duplicates from hifiasm assemblyworkflow (the workflow is shown in Fig 14).

Fig 14. Purge duplicates from hifiasm assembly.
- The workflow invocation window will open.
- Select the raw reads in FASTQ format, and hifiasm primary contig assembly file (FASTA format) using the drop-down menu.
PacBio HiFi genome assembly using hifiasm workflow.- Select correct workflow input parameters
- Click the
Run workflowbutton (as in step 2 of Fig 8). - The
Purge duplicates from hifiasm assemblyworkflow produces the following outputs:- Purged primary sequences from draft assembly (FASTA)
- Purged haplotig sequences from draft assembly (FASTA)
Review Workflow Report
- Review quality control contents of the workflow report (Fig 15).
- Inspect bandage image (Fig 16).
- Review fasta statistics (Fig 17).
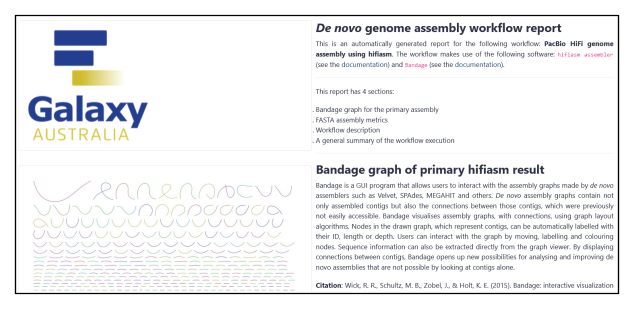
Fig 15. Example workflow report.

Fig 16. Bandage image for the primary hifiasm assembly.
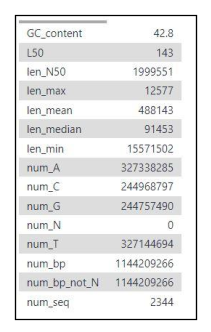
Fig 17. Basic summary statistics are included in the fasta statistics output. This includes: number of contigs (num_seq), assembly size (num_bp), contig N50 (len_N50), L50.
OPTIONAL STEP: Post-assembly quality control workflow
A genome assembly quality control workflow guide is available.
Appendices
Revealing hidden files
- In your history panel, click on
hidden files(as shown by the red box in Fig S1). - If you would like to unhide the data set, click on
Unhide itin the expanded history panel that appears following step 1 (as shown by the red box in Fig S2).

 Editor
Australian BioCommons, University of Melbourne